
Platformer Essentials Cookbook
Hollow Knight Inspired Movement with the Moving Character Recipe
Hollow Knight's basic move set is inspired by Mega Man X, which is also a main reference for the Moving Character recipe, the very first chapter of our beloved book.
In this tutorial, let's learn how to achieve a similar basic movement that will set the tone for advanced movement, like the Wall Jumping Character recipe, presented in the Extra Recipes book.
Let's start with a brief analysis of the Hollow Knight "Knight" movement.
Please, skip to 00:01:45.
Note that the movement is snappy and precise. There's no acceleration to move horizontally. The Knight is either moving at its full speed or is still. This is a fundamental trait of Mega Man X-inspired games, as it goes in contrast with Mario Bros.-inspired games, where the character has acceleration and deceleration, which makes their movement less precise, raising the learning curve.
Also note that the Knight jumps at various heights. His jump height is not predefined. Some people say that this kind of jump correlates to the "the longer the jump button is pressed, the higher the character jumps". But this is not an accurate description.
This would be true if we didn't have a limit for the jump height, and indeed, we could jump indefinitely based on how long we kept the jump button pressed. To make a comparison, imagine the Dash mechanic as a horizontal jump. Having a "held time-based" jump would have to provide the same output as the Crystal Heart ability, see below.
Please, skip to 00:23:45
In this implementation, you hold the dash (jump) button for some time, and after releasing it, you dash (jump) indefinitely until you hit an obstacle.
The most accurate way to describe the kind of jump Team Cherry uses in Hollow Knight is the ability to cancel the jump. In that sense, you have a jump that has a predefined maximum height, but you can cancel it at any given moment by releasing the jump button. Keep that in mind.
Mise en Place - Setting up the Scene
To implement this behavior, we are going to use the CharacterBody2D node, because it allows for custom physics while providing collision handling features at the same time. This recipe doesn’t go well if you want physics simulated movement, if this is the case, I suggest you using the RigidBody2D node instead. That said, let’s follow along the steps necessary to set the scene up.
-
Add a CharacterBody2D node as root of the scene.
-
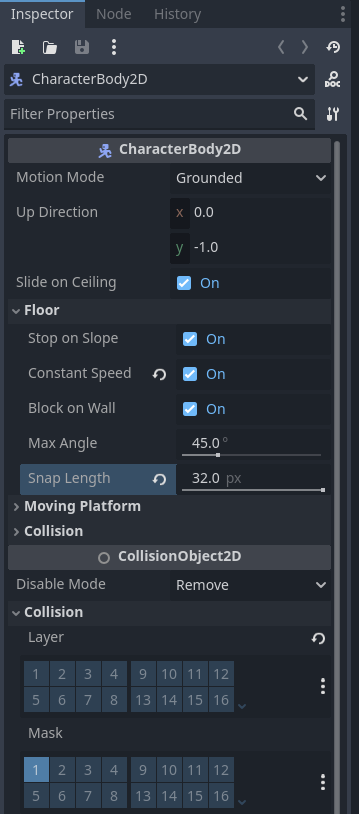
Set the Floor Snap Length property long enough to reach the floor when the character is on slopes. Something between 32 and 64 pixels may do the trick.
-
Toggle on the Constant Speed property.
-
Toggle off the Collision > Layer bit that represents collisions with the environment, usually this is the first bit.
💡 Tip:
We do that because we don’t want other Moving Characters to collide with themselves. By disabling the Collision Layer responsible for collisions with the environment, one Moving Character can pass through the other. This is important to avoid enemies bumping on each other.
Your CharacterBody2D setting should look like this:
Now, let’s move on to the fun part. The script.
Mise en Place - Coding the Script
With the scene on place, let’s add a layer of logic to implement the behavior of our Moving Character. Attach a GDScript to the root node, then:
-
Export some variables to control the movement forces like the character speed, gravity, and jump strength.
class_name MovingCharacter2D
extends CharacterBody2D
@export var speed = 500.0
@export var gravity = 2000.0
@export var jump_strength = 800.0
@export var move_direction := 0
-
In the
_physics_process()callback, apply the gravity on the vertical axis in thevelocity.ymember variable. Since this is an acceleration, multiply the force by thedelta. Then, for the horizontal axis, multiply thespeedand themove_directionvariables.func _physics_process(delta: float) -> void: velocity.y += gravity * delta velocity.x = move_direction * speed -
Then, call the
move_and_slide()method to constantly update the character movement.func _physics_process(delta) -> void: velocity.y += gravity * delta velocity.x = move_direction * speed move_and_slide() -
To implement the jump, we will create a
jump()method, checking if the character is not on the floor, using theis_on_floor()method. If this is the case, we return, not performing the jump, otherwise, we set the character vertical movement to match the negativejump_strengthvalue. This will make it move upwards.func jump() -> void: if not is_on_floor(): return velocity.y = -jump_strength -
To allow players to cancel the jump at any time, we will check if the character is moving upwards, in other words, if its vertical speed is less than
0.0, and if the character is not on the floor. If we match these, then we can stop the movement setting the vertical velocity to0.0.func cancel_jump() -> void: if not is_on_floor() and velocity.y < 0.0: velocity.y = 0.0💡 Tip:
This is how we allow players to control the jump height.
With that, we have everything we need to have a Hollow-like basic movement. The complete script should look like the following:
class_name MovingCharacter2D
extends CharacterBody2D
@export var speed = 500.0
@export var gravity = 2000.0
@export var jump_strength = 800.0
@export var move_direction := 0
func _physics_process(delta: float) -> void:
    velocity.y += gravity * delta
    velocity.x = move_direction * speed
move_and_slide()
func jump() -> void:
    if not is_on_floor():
        return
    velocity.y = -jump_strength
func cancel_jump() -> void:
    if not is_on_floor() and velocity.y < 0.0:
        velocity.y = 0.0
We can add some functions to change the movement direction, wrapping them up and providing a nice interface for user classes:
class_name MovingCharacter2D
extends CharacterBody2D
@export var speed := 500.0
@export var gravity := 2000.0
@export var jump_strength := 800.0
@export var move_direction := 0
func _physics_process(delta: float) -> void:
    velocity.y += gravity * delta
    velocity.x = move_direction * speed
    move_and_slide()
func jump() -> void:
    if not is_on_floor():
        return
    velocity.y = -jump_strength
func cancel_jump() -> void:
    if not is_on_floor() and velocity.y < 0.0:
        velocity.y = 0.0
func move_left() -> void:
    move_direction = -1
func move_right() -> void:
    move_direction = 1
func stop() -> void:
    move_direction = 0
In a future devlog, I will show you how you can turn this recipe into a playable character by adding a CharacterController recipe on top of it! So, follow up for more.
~Henrique Campos
Comments
Log in with itch.io to leave a comment.
Hey, I just read the devlog and realized itch.io's code parser is very bad. The code isn't formatted correctly.
It should look like this:
Appreciate this. Keep it up Ludo. Hope to share what I got working on in your Discord